

- So, we start setting up the device:
- Tests
- Conclusion
- Opportunities
- What's inside?
- Preparation for measurement
- Measurement with a multimeter
- Security measures when working with a multimeter
Do you know how much energy is used on all night for downloading torrents computer? Or, for example, how much can a single movie download? It seems to be all free, because in the torrent we have “file communism”, but still - what is the price of one “free” movie?
And how much is a couple of hours included in the background of the TV? Well, how much money is spent on one cycle of washing things in a washing machine?
Of course, the option is to take instructions to your device, find out all the specifications, and calculate the necessary data. But there is another option - just take and measure everything, quickly and without intermediate calculations, entrusting everything to automation.
This problem should be solved by the “Power meter consumed by household appliances” from MasterKit, the test of which I decided to conduct.
The device must perform several functions:
- keep records of the cost of electricity consumed
- display the power consumption of the connected load
- display mains voltage and current consumption
Equipment includes a box, the device itself and instructions.

Fig.1. The complete device.
The plug on the device is closed with a lid. It was pleasantly surprised that the batteries needed to save data when the device was turned off or electricity was attached. The batteries have already been inserted into the device, a plastic ribbon that breaks the contact protects them from discharge. We remove the ribbon, and the batteries immediately begin to supply the device with energy. A battery is needed so that all the data stored in the device’s memory will be stored for a long time. The battery cover is fixed with a screw and not a latch, as usual. On the one hand, the screw is safer, on the other hand, it is not possible to replace the batteries without using a screwdriver. How difficult a set of batteries is hard to say. The display has a battery level indicator.

Fig. 2. The back of the meter.
Specifications stated as follows:
- Rated voltage: 220V;
- Maximum load power: 3680 W;
- Maximum current: 16A;
- The range of power displayed on the display: 2 ... 3680 W;
- The minimum value of power consumption: 0.1 kWh;
- Power supply: 4.5 V from three AAA batteries.
After turning on the first thing you need to set the day of the week and time. In the instructions, the instrument settings button is labeled as “SET”, however, we will not find such a button on the case, instead the “SET” button.
So, we start setting up the device:
- I tried to adjust the device, briefly running diagonally through the instructions. After all, as you know, the instructions are read only in two cases - when there is nothing more to read and when everything is already broken :). And then an ambush was waiting for me. I expected that pressing the "up" button increases the value of the current tunable parameter, and the "down" button decreases. However, all values are changed only with the “up” button, and the “down” button is intended only for exiting the settings menu (short press) or resetting parameters (pressing for 3 seconds). Of course, most buyers in this place will come a little surprise. Would change the arrow "down" to something else. I figured it out just by looking at the instructions (there was a cant with instructions, more on that below).
The numbers on the display are normally distinguishable only when viewed from a right angle. Of course, a movable unit with a display would be more convenient and it could be turned, for example, with the display pointing upwards. But, probably, such a decision would affect the price, and the cost of the device is very democratic.
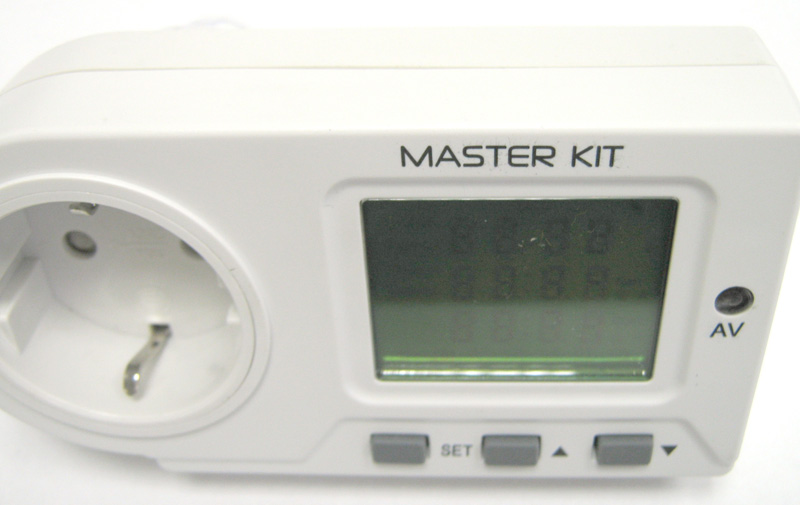
Fig. 3. Display at an angle.
The meter has 3 modes of displaying information on the display:
- Time (in 24 hour format), day of the week, power of electricity in watts (W) and frequency Hz (Hz).
- The current voltage in volts (V), current in amperes (A) and the total time of electricity consumption (H - in hours).
- The total amount of electricity consumed (KWh - kilowatt-hour) and the cost of electricity consumed.
As you can see, the device allows not only to calculate the cost of energy consumed by any device, but also to see how constant the characteristics alternating current online (sorry for the pun). We all know that the quality of domestic electrical networks and, consequently, the compliance of the voltage (and possibly frequencies in exceptional cases) with the standard leaves much to be desired. So, if the device shows us that the mentioned values are far from ideal, feel free to sound the alarm. Otherwise, a quick breakdown of any home appliance is possible.
I already mentioned the instructions above. She gave me a lot of joy - the modes of displaying information on the display in the instructions and on the device differed (see pictures from the instructions and photos of the device below). Of course, these errors will not mislead the user, since on the device it is clear what is being measured, but still not good.
I asked the guys from Master Keith what it was and ... why. They were surprised and figured out in the evening: there are two options for the device, different display. When the display was changed, the instruction was changed, but the original file was rewritten and somehow it was incorrectly saved, as a result a mixture of instructions was born. Now everything has been fixed, a sensible instruction is on the site, but I’ll still post photos =)

Fig. 4. Item "Display information modes" from the instruction.
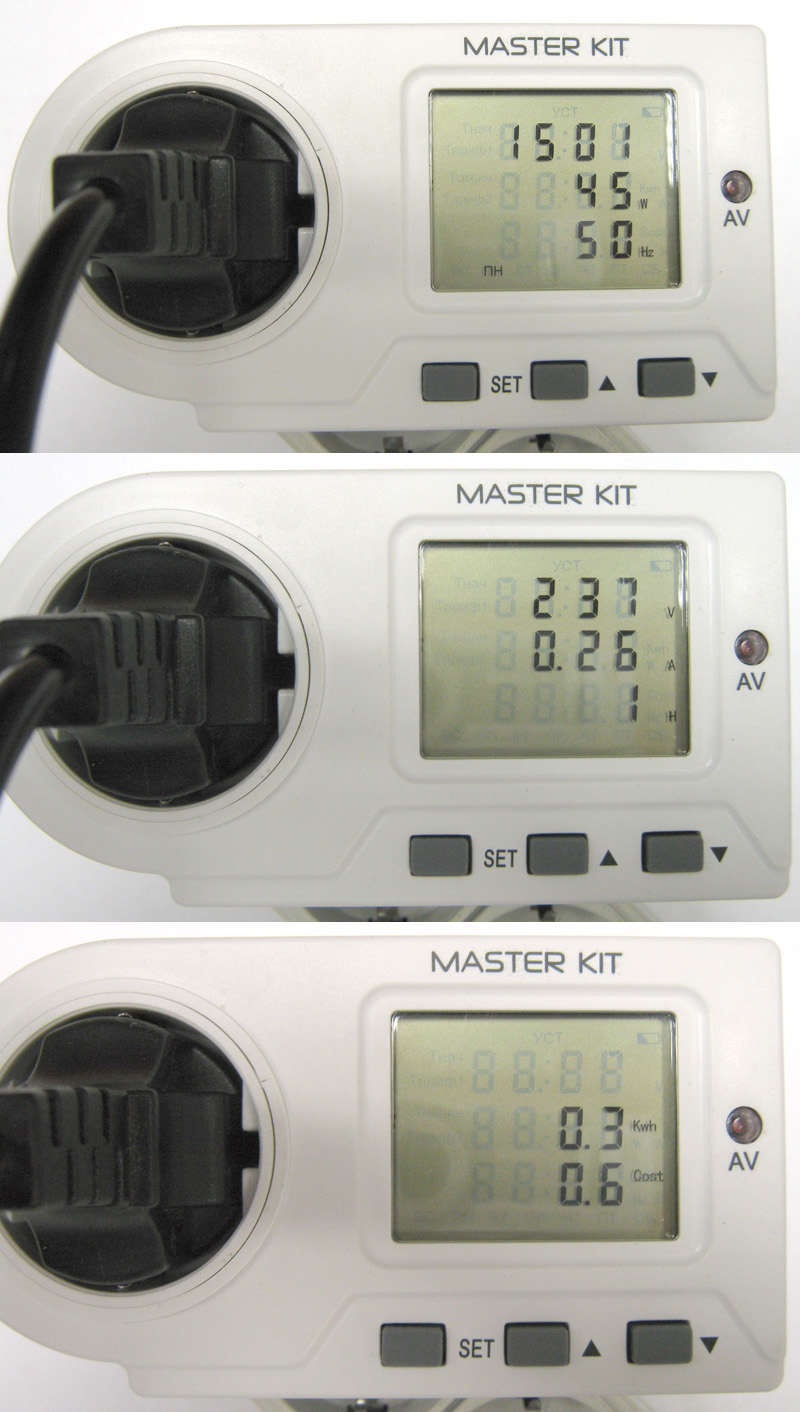
Fig. 5. Modes of information display on the display on the power meter.
The maximum value of the measured power is 3680 W and the current is 16 A. When these values are exceeded, to the right of the meter display, the red indicator lights up and the letter “W” on the display in the first mode starts flashing. I think you should not connect to the device a load with a power higher than 3680 W, you can easily organize a fire.
Tests
For field testing, I first chose a washing machine and was surprised that in two wash cycles in a fast mode in cold water only about 0.3 kWh was spent. On occasion, I will check the consumption when washing in hot water , the instructions promise 1.02 kWh per cycle.
Then I got a hairdryer, according to the device, it consumes 1500 W at a declared power of 1600 W; iron - 2000 W (2100 W is written on the body of the iron). The discrepancy is connected either with the error of the meter, or with the error of the manufacturers of household appliances :).
Unfortunately, I do not have any current ticks at hand, so I can’t determine the accuracy of this power meter.
Now closer to IT topics. Still measured consumers: Acer Aspire 1690 laptop - 58 W (this laptop in a mode of viewing of films in 5 hours consumed 0,3 kW); 19-inch monitor Samsung SM 940N - 24 W; 21-inch monitor Samsung SM 214T - 55 W; Intel Core i7 processor based system unit with a simple video card and three hard drives - 100 watts when booting, 73 watts in idle mode, 130 watts when archiving in 8 streams.
Another system unit on the Core i7, but with a single hard drive, consumes 58 watts, for 48 hours of downloading torrents at night and simple office work during the day, it consumes 2.8 kWh. Those. for a year of continuous operation, such a system man will consume about 500 kW. It would be interesting to compare the consumption of some NAS, but unfortunately I do not have this.
A cheap 2000-watt electric kettle actually consumes 1868 watts. 5 boiling cycles of 1.5 liters of water at room temperature increase the meter reading by 0.7 kWh. Those. roughly speaking, at a cost of 1 kWh at 2.30 rubles, get 1 liter of boiling water costs 23 kopecks.
Conclusion
Despite the flaws in the instructions already corrected, the device is very useful and functional. The recommended price of the device in Russian retail is 1,471 rubles. I think it can be considered as a budget equivalent (the price of this device with delivery to Russia is 112.5 pounds). The device fully performs the functions assigned to it and allows you to evaluate the efficiency of energy use.
So now it’s not so difficult to find out, roughly speaking, how much it will cost to wash a pair of socks, find out the price of downloading a single movie from torrents and explain to mom in money how much TV work costs in the background.
Are you typing a report for your boss at night? See how much it costs. Have you decided to play WOW? Evaluate the actual energy expenditure during the game. Maybe this will not help to save, but such information will not be superfluous.
In addition, the device should be used to assess the reliability of your power supply. So that one day it would not be painfully painful (ay-ay-ay, plasma TV burned, bought six months ago) - it is better to measure all the characteristics in advance, and take care of security measures. Add tags
Instruction
The easiest way to determine the power of the technical documentation attached to the appliance. The power of the device is indicated, as a rule, on the first pages of such documents.
Open the manual (instruction) and find there such words and expressions as power , power consumption , average power , maximum power , etc. The number after them (the range indicated by two numbers through the dash) will be the power of the electrical appliance. After the number should be the unit of power measurement: Watt (W), Kilowatt (kW), Milliwatt (mW) or its international designation - Watt, W, kW, mW, if the instruction is not in Russian.
If there is no instruction and other documentation for the appliance, the power can be determined by the inscriptions on the device. As in the case described above, be guided by the words denoting power and the symbols for units of power.
If the device is relatively modern, then information about it is probably available on the Internet. Type in the search engine the name and brand of your appliance. Most manufacturers of household and electronic equipment provide on the official sites all the necessary information.
If the necessary information cannot be found (as it often happens with old or home-made electrical appliances), measure the power with the help of devices. To do this, de-energize the electrical circuit by turning off the input circuit breaker or switch. Prepare an open circuit by disconnecting one of the power wires from the input device. Attach a piece of wire to this place, stripping the ends to the desired length. Prepare two pieces of wire of sufficient length. The length of the wires is selected based on the placement of electrical equipment and electrical measuring instruments.
Connect a power meter to the electrical circuit. Connect the current circuit to the prepared break. Connect the voltage circuit with wires to the input device. Turn on the power by turning on the circuit breaker or switch. On the indicator or the scale of the power meter, determine the amount of power consumption.
If there was no wattmeter nearby, then you can do with a multimeter or a pair of devices - an ammeter and a voltmeter. To do this, connect an ammeter or multimeter to an electrical break prepared in advance. If it is a multimeter, put it into current measurement mode. Turn on the circuit breaker or switch to energize. Record or remember the current readings on the indicator (scale). Turn off the power. Disconnect the ammeter (multimeter) and restore the circuit in its original form.
Re-apply voltage. Take a voltmeter or switch the multimeter into a mode to measure voltage. Measure the supply voltage by touching the gauges of the device to the output contacts of the switching device. Remember or write down the measured voltage value. Then calculate the power consumption by multiplying the current value by the voltage value. If the voltage was measured in volts, and the current in amperes, then the power will be in watts (W).
If the power supply of the appliance is from household outlet power supply, the voltage can not be measured and taken equal to 220 volts (V). If batteries with known voltage are used for power supply, then voltage measurement can also be omitted.
Recently I told you why you need a special device, a power meter (wattmeter), for accurate measurement of the power of electrical devices that work on the network, and any measurements using conventional multimeters cannot be accurate.
I bought my first BEBUY power meter five years ago in one of the Chinese online stores. He, like many other similar meters, is quite accurate when measuring power from tens of watts, but at low power the measurement accuracy decreases.
In one of the reviews of LED lamps on the website led-obzor.ru I saw a photo of a power meter that showed power values with hundredths. I asked the author of the site, what kind of meter. Turned out to be Robiton. This manufacturer has two models of power meters: Robiton PM-1 and Robiton PM-2. I asked the representatives of the brand to provide me with both models for close examination.
The devices do not differ much in price (PM-1 costs 780 rubles, PM-2 is white in color - 900 rubles, and black - 1000 rubles), but it is very different in terms of capabilities and measurement accuracy.
Opportunities
Both devices are included in the euro outlet, and the load, the power of which is to be measured, is connected to the outlet on the device body. Both instruments have three control buttons. Both devices are capable of measuring power up to 3600 watts.
The device measures the power, the amount of energy consumed by the load (kilowatt-hours), and the cost of energy consumed. The price of a kilowatt is customizable.
The resolution in power measurement is not very high, therefore, with a load of 6 W, the readings of the device all the time “jump” between 5.5 and 6.4 W.
The Robiton PM-1 power meter is suitable for measuring the power and cost of energy consumed by electrical devices of average and high power - computers, heaters, teapots, refrigerators, washing machines.
Robiton PM-2 has much more features and higher accuracy.
Three batteries are used to work the built-in clock and save the readings after disconnecting from the network.
The device displays time, mains voltage, frequency, current, load power, power factor (Power Factor), measurement time, the amount of energy consumed by the load (kilowatt-hours), and the cost of energy consumed. The price of a kilowatt is adjusted taking into account day and night consumption with two-tariff accounting. It is possible to reset the measurement time, energy consumption and cost.
As a source of reference voltage of 230 V, I used an uninterruptible power supply with a pure sine wave APC Smart UPS 700INET in battery mode.
The most accurate of my multimeters - Mastech MY65 (accuracy ± (0.1% + 3), ie ± 0.53 V to 230 V) showed 231.2-232.0 V. Presumably, the source gives 231.5 V. Robiton PM2 honestly showed 232 V. Multimeter UNI-T UT61E overestimated the readings, but its accuracy (± 0.8% + 10) is only ± 2.84 V at 230 V.
As a low-power measuring load, I used a 27 kΩ 2 W resistor. MY65 (accuracy ± (0.3% + 1)) showed that its resistance is 26950 Ohms. Power should be 231.5 / 26950 * 231.5 = 1.9886 watts. Robiton PM-2 showed 1.99 watts. Perfectly accurate!
Robiton PM-1 showed alternately 1.8 and 2.0 watts.
In addition, I measured the power of incandescent bulbs 25 and 75 watts. PM-1 showed 25.7 and 75.4 W, PM-2 - 25.95 and 75.58 W.
I had the opportunity to compare the results of measuring the power of a Robiton PM-2 wattmeter with the results obtained on expensive laboratory equipment for measuring power, and even on a load with a low power factor and "ragged" consumption - LED lamps. Ten different samples of lamps with power from 3.4 to 13.8 W deviations ranged from 0.2% to 2.1%. Excellent result!
Despite the wide range of measurements, the Robiton PM-2 gives very accurate results even at low power.
What's inside?
In order to open the power meters, you need a tricky three-sided screwdriver. The PM-1 design consists of two boards.
There is a calibration button on the indicator board. I decided not to risk it and not to press it.
The reverse side of the main board.
Robiton PM-2 design.
The power meter is an inexpensive and useful device that allows you to see how much various electrical appliances consume. With it, you can find out how much a refrigerator consumes per day, how much it consumes Washer for one wash or find out how much it costs to boil a kettle. With this device, you can determine which electrical appliances in the house consume the most energy (believe me, these are far from the most powerful appliances) and learn how to save electricity.
Of the two wattmeters of Robiton, I, of course, recommend the Robiton PM-2 - it is more accurate and has much greater capabilities. published by
Content:
One of the basic concepts in electricity is current strength. It is determined by the amount of electricity that passes through the conductor for a unit of time. This value is measured in amperes. In turn, the ampere is equal to one pendant per second, where the pendant is determined by the number of electrons passing through the conductor cross section.
Very often you have to decide how to measure. This is of great importance for the operation of electrical systems, since the current should not exceed the established values provided for a particular circuit. Timely measurements avoid emergency situations and failure of electrical equipment.
Preparation for measurement
First of all, it will be necessary to determine the interval in which measurements will be taken. It should be remembered. In accordance with this, for all models the scale is divided into certain sectors, intended for each electrical system subject to verification. Therefore, you cannot use a device rated for 10 amperes to measure a current of 200 amperes. In the best case, everything can do without a blown fuse. The instruction or on the device itself indicates the maximum allowable value of the measured current.
When switching to the mode of measuring current, you need to switch to a specific position of direct or alternating current, which correspond to the designations DC and AC. It all depends on which circuit is checked and which power source is on this circuit. After that, the instrument must be set to the required measurement interval. To completely eliminate blown fuse, the upper limit of the interval should significantly exceed the possible current strength. If, when connected to the circuit, the device does not show anything, then the maximum value of the interval should be lowered below.
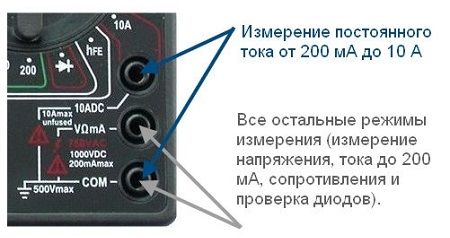
The kit multimeter includes two cables. At one end of each of them is a probe and a connector. Both cables must be connected to jacks that correspond to current measurements. The most accurate designation is described in the instructions.
Measurement with a multimeter
To take measurements, the device is connected to the circuit. It is very important the absence of high voltage in the AC circuit. Therefore, before touching the wires, especially bare, you need to turn off the measured circuit.
After that, the wire is cut in the most convenient places, stripped and both ends of it are connected to the probes. At the same time, they should not be in contact with each other. Then, the circuit can be turned on and started measuring. Thus, the question of how to measure the current through a multimeter is not particularly difficult. It is necessary to have certain skills of working with the device and follow the electrical safety rules.
Security measures when working with a multimeter
It is forbidden to take measurements in the presence of a wet environment or in conditions of high humidity. This is due to the fact that moisture is a very good conductor of electric current. In all cases, the use of protective rubber gloves is recommended.
Before you start, you need to check the integrity, which can be broken due to prolonged use. In such cases, the probability of an electric shock is very high.
In case of electric shock, the victim must be given first aid. Therefore, it is best to measure with a partner able to hedge in case of a contingency situation.
After measurements are taken, the current must be switched off again and the cut wires must be interconnected.
Page 22 of 56
§ 22. Measurement of AC power
Electric power is one of the most important regime parameters characterizing the power consumption per unit of time. In DC circuits, power depends on the current flowing through the load and the voltage applied to the latter, and is associated with them by the simple relation P-U1. Since there is a definite relationship between current strength and voltage (Ohm’s law), the power dissipated on the active resistance r can be determined by the formulas: Р-Рг, or Р = -, where Р - electric power , one - current strength U is voltage.
Obviously, to measure power in DC circuits, one can do without special electrical measuring instruments (wattmeters), knowing the indicated ratios. The unit of power is 1 W, i.e. the power consumed by the load with a current of 1 A and a voltage of 1 V. The larger units are kilowatts (kW) and megawatts (MW): 1 MW = 1000 kW = 1,000,000 W .
In AC circuits, such ratios are applied only to loads with a purely active resistance (incandescent lamps, resistance furnaces, electrical heating Appliances ), and if available electrical circuits inductive and capacitive impedances have to take into account the phase shift between current and voltage, expressed in terms of power factor (cos In single-phase alternating current circuits, knowing the voltage U applied to the load, the current flowing through it, and> 9 the phase shift between voltage U and current strength /, active, reactive and total power can be determined by the formulas:
moreover, active power, as in DC circuits, is measured in watts, kilowatts and megawatts; full power in volt-amperes (VA), kilovolt-amperes (kV-A) and megavolt-amperes (MB-A), reactive power in Vars, Kilovars and Megawars.
The resistance in AC circuits corresponds to the resistance in DC circuits, but in magnitude it can be greater or less than the resistance of direct current, which is determined for conductors of electric current.
This is due to the surface effect, which is to displace the alternating current from the center of the conductor to its surface, and therefore the effective conductor cross-section decreases, and additional dielectric loss (dielectric hysteresis), steel wires, magnetic conductors and magnetic conductive materials surrounding the conductors with current (magnetic hysteresis) and, finally, with eddy currents arising in massive electrically conductive structures surrounding the conductor with current.
The phase load Pt = P2 = P3 is the power connected to the line voltage U, the line current / and the power factor cos ф by the following relation, for example, for active power: P- = | LzS / cos f. In addition, if the power of one phase is known, for example, the active power Rl of the first phase, the power of the three-phase current P will be equal to three times the value of the power of one phase R = R3.
During commissioning, both direct and indirect methods of power measurement are used. In direct measurement of power, wattmeters are used, while in indirect measurement, other quantities are first measured, and then, using known dependencies between these quantities and power, power is determined.
For direct measurement of power, portable single-phase and, less commonly, three-phase wattmeters of active power are usually used. When selecting the wattmeter and assembling the measuring circuit, it is necessary to take into account the relationship between the load resistance and the internal resistance of the wattmeter windings (current and voltage). If the load resistance r „is comparable with the resistance of the current circuit of the power meter or less, the power meter should be turned on according to the scheme (Fig. 94, a). When the load resistance is commensurate with the resistance of the voltage circuit of the wattmeter or more, the wattmeter should be included according to the scheme (Fig. 94 b).
More accurate results can be obtained, given the power consumed by the wattmeter itself. To do this, when turning on the wattmeter according to the scheme (Fig. 94, a), knowing the resistance of the voltage circuit of the wattmeter and measuring the voltage U „applied to the load, one should subtract the power consumed by its voltage circuit Pu from the wattmeter readings, determining it by the formula or measuring
gi the same device with disconnected load. 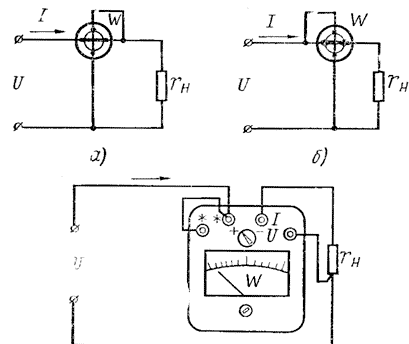
Fig. 94. Diagrams of switching on the wattmeter: a and b - principal, in-mounting
AT)
When turning on the wattmeter according to the scheme (Fig. 94, b), knowing the resistance of its current circuit g / and measuring the current / flowing through the load, from the readings of the wattmeter it is necessary to subtract the power Pi -Prj consumed by its current circuit.
When turning on the wattmeter in a controlled circuit, it is necessary to take into account the polarity of its conclusions (the beginning of the current winding and the voltage winding). They are usually indicated with asterisks. In fig. 94, in it is shown the correct inclusion of the power meter with its direct inclusion in the tested circuit, and in fig. 95 - the proper inclusion of the power meter through the measuring transformers. When the wattmeter is turned on correctly, if the power is positive, that is, it is directed from the power source to the load, the instrument arrow will deviate to the right, if the power is negative, that is, it is directed toward the power source, the instrument arrow will deviate to the left. 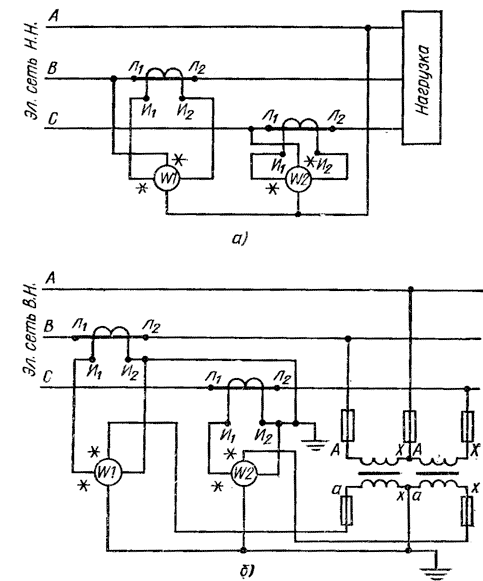
Fig. 95. The inclusion of wattmeters through instrument transformers:
a - through current transformers, 6 - through current and voltage transformers
Therefore, to produce a readout of the wattmeter, you have to swap the wires suitable for its voltage winding, and if the wattmeter is equipped with a polarity switch, it is enough to switch the latter to another fixed position. Usually these provisions are marked with “+” and “-”. After that, the wattmeter needle will deflect to the right, it will be possible to take its readings, but they should be recorded with the “-” sign.
For example, the wattmeter for measuring the power flowing through the line was switched on according to the scheme (Fig. 96, a) and the instrument arrow went to the left. To take readings, wires connected to its voltage circuit were switched, as shown in fig. 96, b. After that, the instrument arrow deflected to the right and was set against dividing 800. However, since we changed the polarity of the instrument, we should write down the measurement result with the “-” sign, i.e. P = -800 W. In addition, the industry produces wattmeters (usually shield-type) not only with zero at the beginning of the scale, but also in the middle. 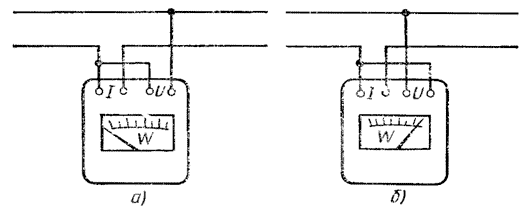
Fig. 96. Switching voltage circuits for meter readings
Such wattmeters are usually installed on control panels for measuring power on transmission lines, so that operational (duty) personnel can immediately determine not only the magnitude but also the direction of power (from buses to a line or from a line to substation buses).
Portable wattmeters of active power are usually graduated at a power factor of one. The limit of measurement for power is equal to the product of the rated values of current and voltage. For example, if the rated current of a wattmeter is 5 A, and the rated voltage is 300 V, its measurement limit for power will be 300x5 = 1500 W. If the scale of the device is divided into one hundred divisions, each division of the wattmeter (division price) will correspond to 15 watts. If, for example, the instrument's hand has stopped against the 40th division, then the power indicated by the wattmeter will be 15 x 40 = 600 W. Low-cosine wattmeters graduate at a power factor other than one. The division price and power factor at which the graduation was carried out are indicated by the manufacturer on the instrument scale and in its passport.
Indirect measurement methods are used to determine the shelf (apparent power) S, measuring current and voltage, reactive power, measuring active power, current and voltage after calculating the total power or counting directly the formula Q = y U2P - P2. Measuring the current strength /, the voltage U and the power factor cos f, can be determined indirectly and the active power R. However, it is rarely used to indirectly measure the active power.
It should be borne in mind that the use of indirect measurement methods, when one has to use several instruments, leads to a complication of the measurement process and an increase in its error, since it is assumed to be equal to the sum of the errors of all instruments used for measurement.
The power factor during commissioning, for example, in determining the load of electric motors, is often measured indirectly by the formula, but in some cases they also use the direct measurement method using portable phase meters.
The indirect method of power measurement is also used when it is necessary to determine the average value of power over a long period of time using counters (active to determine active power and reactive to determine reactive power). For this, the difference in meter readings at the beginning and end of the period for which the average power is required should be divided by the duration of this period.
In a three-wire three-phase network, power is usually measured by two single-phase wattmeters or one two-element three-phase wattmeter. When measuring the active power wattmeters include a scheme (Fig. 97). In this case, if Р is the first wattmeter W1, and Р2 is the second wattmeter W2, then the three-phase current power P is defined as the algebraic sum of the readings of both wattmeters: Р = Р1 + Р2.
The readings of wattmeters are recorded with a “+” sign if their inclusion exactly corresponds to the diagram given, taking into account the polarity of the leads and with the corresponding position of the polarity switch. With a uniform load of phases, it is possible to establish the dependence of the readings of wattmeters on the power factor (Fig. 98, a). If cosφ = l, both wattmeters always show values of the same sign and magnitude (PX = P2). With cosφ = 0.5, the reading of one wattmeter is zero (with inductive load P1 = 0, with capacitive load Pg = 0). When cos φ 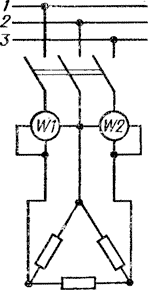
Fig. 97. Diagram of power measurement with two watt meters
This dependence of wattmeter readings on power factor allows using the same wattmeters of active power not only to measure active power in a three-phase network, but also to determine reactive power Q, tangent angle tgφ and power factor cos φ: 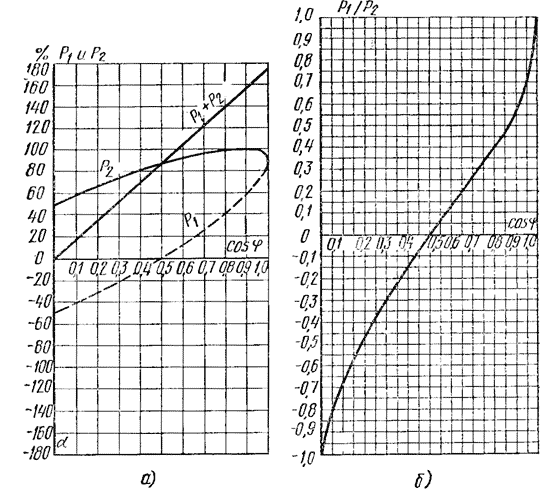
Fig. 98. The dependence of the readings of wattmeters from the power factor (a) and a graph for determining the power factor from the ratio of the readings of two wattmeters (b)

Fig. 99. Turning on the wattmeter for measuring power in a three-phase network: o-active, b-reactive
The power factor can be determined from the Pt / P2 ratio using the graph shown in Fig. 98, b.
In a symmetric three-phase network with a uniform load, one wattmeter can measure the active power according to the scheme shown in Fig. 99, and, and reactive power according to the scheme aimed at fig. 99, b. If the wattmeter readings are Pb then, when measured according to the scheme (Fig. 99, a), the active power of the three phases is P = LR \, and when measured according to the scheme (Fig. 99, b) the reactive power of the three phases is Q = ~ \ I3 Pb 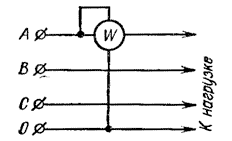
Fig. 100. The inclusion of wattmeters for measuring power in a four-wire network
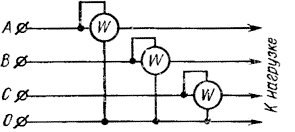
Fig. 101. The inclusion of a wattmeter for measuring power in a four-wire network with a uniform load distribution between phases
The readings of wattmeters when measuring power in a three-wire AC network P -40 divisions, P2-100 divisions, the whole scale of each device is divided into 150 divisions, the rated voltage and current strength of the devices are respectively 300 V and 5 A.
What electrical measuring instruments used in commissioning works to measure current, voltage and power?
Select a voltmeter and a measurement limit for measuring voltages on a load of 30,000 ohms, connected to a 220 V dc source through an additional resistance of 100,000 ohms.
Draw a diagram of the compensation method of measuring voltage and explain its essence.
What measures should be taken into account when measuring the voltage in low-resistance circuits?
Choose an ammeter to measure the current in a 15-ohm load, powered by a 2.5-volt DC source.
What methods and devices are used in commissioning and I measure current in controlled circuits without breaking them? How does the test block work?
How to determine the power in the DC circuit by measuring the current and voltage?
How to turn on the single-phase power meter when measuring power in a controlled circuit?
What is the power in the tested circuit (measured by the method of two watt meters)?
How to measure the full power of a single-phase current using an ammeter and a voltmeter?
It seems to be all free, because in the torrent we have “file communism”, but still - what is the price of one “free” movie?
And how much is a couple of hours included in the background of the TV?
Well, how much money is spent on one cycle of washing things in a washing machine?
Are you typing a report for your boss at night?
Have you decided to play WOW?
What's inside?
What electrical measuring instruments used in commissioning works to measure current, voltage and power?
What measures should be taken into account when measuring the voltage in low-resistance circuits?
What methods and devices are used in commissioning and I measure current in controlled circuits without breaking them?